Friday, February 24, 2012

Thanks Coach!

Basketball season is coming to a close.  At our house, Reader R., who LOVES basketball, played on a team for the first time this year.  She played with a great league called Upward.  We have LOVED Upward!  It was a wonderful, non-competitive, all positive experience for my young basketball player!

The Upward Magnet - The Inspiration

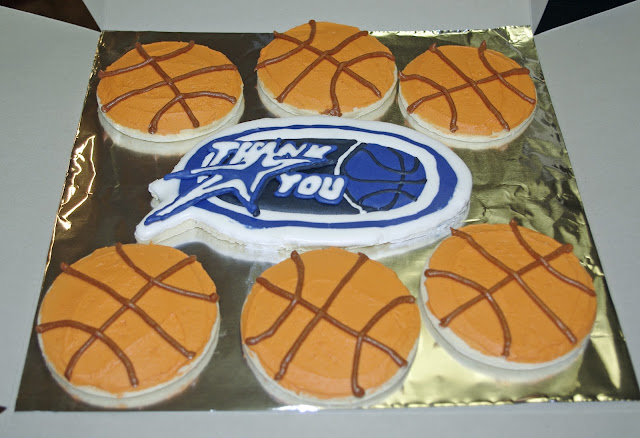
At the beginning of the season, she was given this magnet.  I thought that it would make a really cool cookie.  It took quiet a bit of cookie engineering and used several different techniques to pull it off but I am REALLY pleased with the results.  (This was by FAR the most complicated cookie I have tried to date.)  First, I used the magnet as a template to hand cut the dough.  

The Upward Logo: Cookie-d

Thanks Coach!
Then, I made and colored the royal icing.  I didn't realize how tricky it could be to get just the right color when you are copying a real object.  (It doesn't really matter what color green you make your Christmas trees, but you don't want to butcher a logo.)  

Next, I created a royal icing transfer of the star and the lettering. (I figured that way, if I messed it up it would be easier to do it over.)  I stuck the magnet to the back of a cookie sheet and covered it with baking parchment, so I could "trace" the shape, since it was not symmetrical.


Cookie Scraper (Boo-Boo Stick)
The "Boo-Boo Stick" 
Purchase 3 today at Karen's Cookies
(www.karenscookies.net) for only $0.69  each!
The next step was to outline and flood the outer stripes.  I used a wet-on-wet technique to do this.  I had some trouble getting the light blue stripe to vary consistently from thin to thick and not to spread where I didn't want it to.  I also have a hard time working out exactly how much flood to use to fill the space, so sometimes I have some overflow issues.  Then I use another FANCY technique called "Cookie SCRAPING."  For this technique, I use an amazing tool - THE BOO BOO STICK!  I have several of these and could not cookie without them.  Basically, I use the flat edge to scrap the icing off the cookie in the places where it didn't go where I wanted it to and start over.  (It is also helpful in lifting your cookie from the decorating tray when you have over-flooded and overflowed and you didn't realize it until the cookie is dry and STUCK to the tray.)  I also use it to poke out my frosting air bubbles and the pointy end is handy for cleaning out decorating tips.

After that I outlined the basketball and then flooded the navy field and the light blue ball and then after that was dry, I went back and top dressed the ball.  Finally, after it had dried some, I used a thin coat of royal icing to "glue" the transfer on.  I put it in a box with a half-dozen basketball cookies, and I think it makes a nice "Thank You" gift for my daughter's coach.


One of the moms from another team in the league, ordered celebration cookies for her son and daughter's teams.  I made a few extra cookie for their coaches, too!  Thanks Angie!


New"In-Motion" Basketballs...
look more like the real thing
(compare to the basketballs in the 1st photo).


Do you know of a basketball team that is celebrating a fun season or a coach that should be thanked for his or her time, encouragement, and hard work?  Or do you need cookies to help celebrate March Madness?  Call or e-mail Sarah today to place your order!

Thanks!
Sarah


Tuesday, February 21, 2012

Confessions of a Cookie Baker: A Behind-the-Scenes Look at the Making of the Rainbow Treats!

Hi Friends,

Yesterday, I shared baby K's special rainbow 1st Birthday Party!    As promised, today, I am going to share a few photos of what it takes to make 3 dozen rainbow cookies and more than 18 dozen rainbow mints

My copy of the "inspiration" cookie!

First, a huge shout out goes to Callye at The Adventures of Sweet Sugarbelle for teaching me how to make these rainbow cookies!  Her blog gives detailed, step-by-step instructions on how to make this cookie (and many others).  (I also love how she is willing to share her "mistakes" so that we do not have to make them!!)  Callye, you and the other cookie mentors, are a HUGE blessing to those of us who are just getting started, stretching our imaginations and helping us to believe that we really can create cookies as cute as the ones we, and our customers, see online.  Thank you!!! 

++++++++++++++++++++++++++++++++++++++

My dear friend, and dream-customer, Kara contacted me in OCTOBER, to just chat about what we could do for her baby's 1st Birthday party in JANUARY!  (LOVE THAT!)  She sent me some photos of cookie ideas she had seen online, including Callye's rainbow... and we went from there.

So, when I get a cookie order, after we have finalized the details, I book it on my cookie calendar, and send a confirmation e-mail, with a copy of a detailed invoice, just to make sure that everyone is on the same page.  (Don't want your cookies to be delivered on the wrong day or have your child's name spelled incorrectly!)

Then, I work out my baking schedule.  Because I am a wife first, mom second..., and cookie-baker about fourteenth, I slot out small bits of time, over several days, to make your cookies.   I save four or five sessions, between an hour and two hours each, for:

  1. Mixing cookie dough, 
  2. Rolling, cutting & baking, 
  3. Making frosting/icing/flood, 
  4. Decorating & drying time,
  5. Photos & packaging.
Unfortunately, I didn't think of this "behind-the-scenes" idea, while I was working on the project, or I would have a lot more photos to show you... like the 14 lbs. of powdered sugar I used, or the huge pile of dishes I washed, several times... ;^) but here are the fun picture I do have that I thought I would share...


When I purchased 18 squeeze-bottles for Royal Icing flood icing, I thought I was CRAZY, that I would never use that many... but this is what it took to make my rainbows (and two dozen+ Legos).


Rainbows and Legos Drying


I decorate my cookies on these trays, so that I can move them back and forth from the kitchen to my dining room where they dry.  (I put the chairs up around the room, so that my kids can't get too close!)

(I am also really glad that I don't have a photo of me standing on my dining room chair trying to take this photo...not pretty.)


Time for the "How many cookies can I squeeze in the box?" Game.
Photographing and packaging the cookies are fun too!  I usually take a LOT of photos of my cookie creations. 


(It doesn't help that I usually finish them in the middle of the night, so the lighting isn't the best.  I need to make a light box!  Also, I have promised myself to learn how to take better photos of my cookies and learn how to edit them better too, but I have been too busy baking to take the time, which is really a good problem to have. ;^))

All boxed up and ready to go!  

This is what the packaged box looks like.  I tie it with silver curling ribbon and add my business card.  I usually try to include a special "Thank You" cookie package too!

(I finally got smart (and a little bit of capital ;^) and purchased a bunch of boxes, so now I don't have to go to the store and buy a box for each order.)


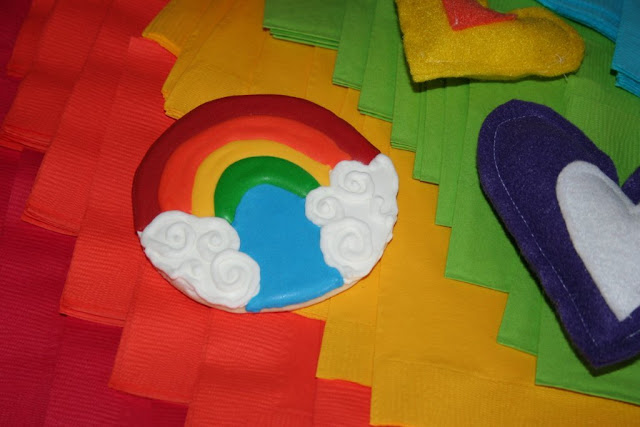
For this special 1st birthday order, I wanted to do a rainbow onesie for my special "Thank You" cookie.  "Thank You" cookies are extra fun for me, because there are no expectations (which makes them easy to exceed...).  It gives me a chance to try new ideas and cookie designs in a "no fail" environment.  For example, I wanted to try a tie-dyed onesie, for this uber-cool family, but it didn't turn out the way that I expected, so I also tried a simple heart and then a cute rainbow.  

(I made this one because rainbows always remind me of God's covenant love for His people. In this case, it reminded me of how Baby K is surrounded by the love of her family.)

The rainbow turned out adorable... so I added these little rainbow hearts too.  Then I put the baby's name on the onesie and her family's names on each of the hearts.  It turned out so cute!  And a really fun surprise for everyone!  


Now, the cookies were done and it was time to start the mints...


The mints were an extra special touch for this order.  Kara's girls had my mints at an American Heritage Girls awards ceremony.  (If you haven't heard of AHG, check it out!  It is an amazing organization for training young ladies!)  Anyway, Kara's girls loved my mints, and so she ordered sets of rainbow-colored mints for party favors.  6 mints X 36 party favors = a LOT of mints!


I dried them on my trays in stripes to make it easier to package them.  Only a bit slap-happy, this is what they looked like on my "drying room table."


Whether I am baking cookies or mints, I always make extras.  I have a fear that I am going to drop a whole tray and have to start over from step one.  Someday I will.  Until then, my friends and family will have to eat the extras. ;^)  


When I party-favor wrap my treats, I always put my label on the back of the package.  That way, whomever ends up with the treat knows where they came from and can contact me for the ingredients and allergy information, just in case. 

Thanks for following the steps I go through to complete a cookie order.  Now, you can see how much love I bake into every batch!

Have a great day!
Sarah


Monday, February 20, 2012

Rainbows, Rainbows Everywhere!

One of my dear friends, Kara,  invited me to be a part of the 1st Birthday celebration for her sweet baby girl! 

My Rainbow Cookie - For more information on the Rainbow Cookie,
check out my "Rainbow Party - A Behind the Scenes Look" post.

It was a rainbow themed party!  I baked the cookies (Thanks Callye  at The Adventures of Sweet Sugarbelle for the tutorial)  and made the rainbow-colored mints that she sent home as party favors. 
Rainbow-colored Mints for Party Favors.

Kara baked cool colorful cakes in jars and made this wooden rainbow puzzle with her girls!

They had a whole rainbow of healthy snacks, too!

Kara did EVERYTHING else to create a wonderful and memorable event... including providing me with these great photos of the party!  She is a great friend and a totally awesome mom to four adorable girls!  She thought of everything!  Here are a few of her great ideas!

I love how she decorated baby K's tray with ribbons!

She did fun rainbow face-painting!

She even rainbow-colored the soap in the bathroom! ;^)

Thanks Kara for letting me be a part of baby K's special day!


Check out this cutie!  A balanced diet is a cookie in each hand! 
Happy Birthday, sweet baby K!

Like anything worthwhile, a lot of love (and work) goes into making it extra-special, check out my next post for a fun, behind-the-scenes look at the making of the rainbow treats. 

Thanks!
Sarah


Saturday, February 18, 2012

Curious K Turns Four - Curious George Style!


My darling daughter, Curious K, turned FOUR earlier this YEAR.  For this big birthday, she wanted all things Curious George... Surprise!


Cute cookies for her preschool class.

With her birthday so near to the holidays, we often end up having multiple celebrations, so here is a peak into the myriad of treats I cooked up for my curious girl!

Cupcakes for her family dinner.

The big "Happy Birthday Hat"
is a special family tradition.

My big girl and her cake!


Happy Birthday,
Curious K!

I love you!
Momma

Thursday, February 16, 2012

Happy "Belated" Valentine's Day!

Hello friends! 

These are half of the cookies I wanted to make for Valentine's Day, but didn't get done until today.  (The other half, I have put in the freezer, with the languishing cake pop cakes and the Christmas cookies I still haven't had time to decorate, for the the time when I have more  time to do what I really wanted to do... by then, nobody will want to eat them, but they will be BEAUTIFUL! ;^)


They would have turned out better with Royal Icing, but I just didn't have the energy for that this morning and had a ton of fluffy frosting left (because I didn't make the cupcakes for Reader R's class.  Yes, I am still feeling guilty about that...).


"My Fuzzy Valentine" Monster Sweets! 
Thank you, Georgeann, at LilaLoa for the inspiration.

"Forever LOVE Stamp"
My first attempt at a sprinkle stencil. 
Would have been better with RI.  Oh well. 

And a few Hugs and Kisses!
Simple "Conversation Hearts" can say so much.
I also just wanted to share this word of truth:

"In this the love of God was made manifest among us, that God sent his only Son into the world, so that we might live through him. In this is love, not that we have loved God but that he loved us and sent his Son to be the propitiation for our sins. Beloved, if God so loved us, we also ought to love one another."   1 John 4:9-11


That is the reason we celebrate this fun holiday!  Thanks, Tracy for the reminder.

Happy "A Few Days Late" Valentine's Day!

Sarah


Tuesday, February 14, 2012

Happy Valentine's Day!

My Valentine's Day baking is a little off track this year, since my family has been hit by the plagues (since Halloween between the five of us, we have had bronchitis, pneumonia, sinus infections x4, an ear infection, influenza, strep, the stomach flu, and the mysterious five-day fever,  (and Curious K, who is usually the "sick" one has avoided them all...) and that doesn't count the conversation heart I had to remove from Lil' L's nose the other day.  Stick a fork in me, I am DONE with this winter.

SO, that said.  I have only been baking when we are HEALTHY, which is hardly ever.  But, last week in a fit of baking flurry, I decided to try making "Cake Pops."  Whoa, Nelly! 


For the girls' teachers.

I admire anyone who can make a zillion beautiful cake pops.  I now understand why in her book, Bakerella, says to start with 12.  I couldn't decide which to make, so I made cherry chip with vanilla frosting, red velvet with chocolate frosting, and red velvet with chocolate frosting.  (For you non-cake-pop-bakers, that is enough cake to make 12 DOZEN cake pops, not 12.  WWIT -- What was I thinking?)  Not really a wise choice.  (I now have three half cakes in my freezer, just in case anyone else wants to try to make cake pops... ;^)

My first cake pops. 
Funny thing, the very first one, the wrapped one, turned out the best. They went downhill from there.

What I decided is... cake pops are for kids, but are not made by kids, and I will only make cake pops for someone I really LOVE!   (My 4 year-old, Curious K, has requested "bake pops" for her birthday until she is 10! ) Oey!

For my "sweet" family! 
(Note: Lil' L. will not be allowed anywhere near the regular-sized conversation hearts!!)

And I did squeeze in one cookie order, for a friend who is working to raise money for orphans in Haiti through the Global Orphan Project.  Her daughter, Anna, has a heart for Haiti.  She has also created a CD to raise money and awareness.  Check out Anna's Heart for Haiti website.  Be sure to listen to her CD too!  These treats were a special "Thank you" for her to give some of her recent encouragers and supporters!  Thank you, Kari!


Needless to say, the cupcakes for Reader R's class didn't get done... but at least no one threw up today. ;^) Ah, it is the little things in life...

Happy Valentine's Day!

Sarah

Friday, February 3, 2012

Confessions of a Cookie Baker: Food Coloring

If you have been following me for a while, you might know that I am a very "Type-A" in certain areas of my life.  I find it a little odd that I am upset when the washcloths are not folded correctly, but will let my desk stack up with junk until it looks like Mount Everest.  "Interesting" is how my Grandma Schalekamp would describe it. She always said things were "Interesting" when she could not find something nice to say about them.

So here it is.. one of my "cookie idols" Georganne at LilaLoa, just posted a fascinating post about her food coloring collection.

Georganne's Food Color Collection

It made me realize that my collection is a lot like me, colorful, mostly organized, and little stuffy. 

My "Interesting" Food Color Collection

I have two Ziploc boxes (because they fit, stacked on my upper cabinet shelf and they hold the colors standing upright, so I can quickly find the ones I want.)... one for my "Good" food coloring and edible markers, and one for everything else.  (I am too frugal to toss the old food dyes, even though I will probably never use them.  I feel the same way, about the huge bottle of green food coloring that I inherited from my grandmother who passed away more than a decade ago.)  The boxes are different colors, so I know exactly which one I am getting.  I keep a copy of Sugarbelle's color mixing chart in my "Good" box, so I don't have to look it up every time I need to make a funny new color like "Avocado."  And although, you probably can't tell from the photo, the Wilton colors are organized by shade, with the oldest (needing to be used first) on top, and the Americolor are organized by sets, the student set, the baby color set, etc. in the order that I purchased them, which means nothing to anyone except me. (And probably explains why my husband has a hard time putting my spatula collection in the correct places... hmmm.)

It made me wonder if Georganne's cookies are so amazing, because she really is an artist.  Her colors look like artist's colors.  My colors look like maybe I should have been a grocery store stocker or worked at a library (with a really complex catgorizing system that doesn't make sense to anyone).
So there you have it.
Food Coloring... who knew you were so "interesting."

Sarah