Saturday, July 28, 2012

For Some Awesome Teachers...

This past year, my middle daughter, Curious K. was in the Eager Elephant class at Awesome Kids Preschool.  For teacher appreciation day, we created these cookies to thank her teachers and the school director!

For Mrs. Traynor, the school's Director.

Curious K. loved being an Eager Elephant!
Hearts and "Thank You" Signs

Flowers


An Awesome Kids Preschool logo cookie with a teacher cookie and a Curious K. cookie.

Curious K with her "Awesome" teachers - Mrs. Davis and Mrs. Lester


These cookies were totally inspired by Tara atThe Shaky Bakerand some wonderful cookies she made for her daughter's school auction!

Did you see the cookies that I made for my oldest daughter, Reader R's teacher appreciation day?

Have a great day!
Cheers!
Sarah

An Apple for the Teacher???

No, way!  You're talking to the Cookie Lady after all!

At our school, we do it up BIG for Teacher Appreciation Week (in May. Yes, I am a little behind.)  This year, we sent our teachers on an imaginary cruise, with activities planned for each day.  We had "Bon Voyage" posters, a special lunch with the captain (the principal), a spa day, a day on shore, and a Mexican fiesta.  It was a big hit.

For teacher appreciation week, I made my favorite cookie EVER!!!


This is the Reader R. cookie!  

(It was totally inspired by Tara at the Shaky Baker and some wonderful cookies she made for her daughter's school auction!)

Reader R. LOVED her 1st Grade teacher Mrs. Cox.  I had heard other parents say that Mrs. Cox has an amazing gift at making your child feel like the most important student in the school... but that she does that for every current and past student at the same time.  Well, it is true!  ;^)

So, when Reader R. heard that we were sending Mrs. Cox on a cruise, the first thing she wanted to know was if she could go with her!  So that is what we cookie-d...a mini Reader R. and everything else you need for a cruise, a sun hat, sun glasses, a pair of flip-flops, etc. and put them in a big pink sun hat. 


We also made cookie packages for the principal and the specials teachers with just hearts and shades and a note about how they are "So cool they have to wear shades!"

These were some of my first glaze cookies!  Thanks to Shari Felich for the recipe, and thanks to some encouragement from Cristin at Cristin's Cookies and this WONDERFUL tutorial on glaze with Cristin and Arty MaGoo, I gave it a whirl!  I am so glad that I did!  Now I don't have to be afraid of dark colors any more!  (Which is especially important since our school colors are maroon, black, and grey! Go Chargers!)

For my preschooler, Curious K, we personalized her teacher appreciation cookies too, but we'll include those in another post...

Cheers!
Sarah


Friday, July 27, 2012

Couture Cookie Collection for Glam Gals

Earlier this Spring, I was challenged by a cookie customer to bake some "Couture Cookies" for her high-fashion friends as party favors for a shopping/beach trip.

As my normal uniform is a pair of jeans and an old sorority t-shirt, this was a both a cultural and cookie stretch for me! ;^)

Thanks to my good friend Google and some AMAZING cookie artists out there, this is what I came up with for her!
All packed up and ready to go to the beach!


The full extent of my "Couture" knowledge was summed up in this Christian Louboutin shoe cookie. Way back in my brain, I had stored an article from the Wall Street Journal about trademarking the color red.   

I also have a relative, my husband's father's cousin's daughter, Whitney, who lives in California, who had these fancy shoes for her AMAZING wedding... that you can read all about on this Every Last Detail post.  (She probably knows someone famous, since she and I are only four degrees of separation apart!)  Modern Elegant Pink & Black California Wedding

But they were to beautiful to try to cookie, so enough about shoes, and more about cookies...


These Chanel logo cookies were copied from Oh, Sugar!  Her amazing Chanel party should not be missed!  She was also smart enough to use royal icing transfers, but I kept breaking mine and just ended up using push pins to mark the ends and the joints of each C and then drawing each one.  (This trick would also work for your Olympic Rings!)  You do have to get it right the first time though, because you CANNOT scrape the black off the white quilting.

I also learned the quilting from two very helpful tutorials:

Since I was covering with white, I didn't draw lines on my cookies.  Instead, I traced the circle on a piece of cardstock and marked my lines with a ruler that extended past the edge of the cookie.  That way, when I was icing, I could visually line up the diagonals to keep my lines straight.


The Louis Vuitton cookies were inspired by this amazing cookie artist: Kava Dolce, which I found on the Art of Cookie website.  (Her bags are AMAZING!  I have no idea how she does those, but with some help from this Luster Dust Tutorial by Hani at Haniela's I pulled these off.  I used a pearl luster dust on the base and a gold on the logo and the  accents.

My customer wanted "Little Black Dress" cookies.  I tried to warn her against the taste of black icing... but she definitely wanted the dresses, so I ventured into more unknown territory and tried my hand at glaze.  So I borrowed a tried and true glaze recipe from my dear friend Shari, and thanks to some encouragement from Cristin at Cristin's Cookies and this WONDERFUL tutorial on glaze with Cristin and Arty MaGoo, I gave it a whirl!


I ended up deciding that I preferred to let the glaze run off the sides and the bottom edge of the cookies so that it would wrap around and look more like a dress.  The best news... glaze only takes a tiny bit of food coloring to get dark black, so they tasted great!

I also gussied them up a bit by adding a tiny ribbon around the waist! ;^)  (That is Kansasan for "making them fancy.")


However, when it comes to beach wear, the big floppy hat and shades are more my style.  I created these as "special extra" cookies for my customer!

While I was at it, I made some flip flops too!  They were a perfect touch for two other projects: one for Teacher Appreciation Week, which I will blog about next time...


... and the other for these adorable "Mother-Daughter Flip Flops" for my flip-flop-loving, glaze-recipe provider, dear friend Shari, who had just finalized the adoption of her foster-daughter Willow!   They are based on my favorite flip flops of the summer from Charming Charlies!

(The big ones were a flip-flop cutter, but I made the little ones out of a jellybean cutter!) ;^)

Have a great day!
Cheers~
Sarah

Thursday, July 26, 2012

Confessions of a Cookie Baker: Games Cookie-Bakers Play...


Confession:  I usually bake extra cookies, to make sure that I have plenty to complete an order, but frankly, by the time I have finished the order, I am often bored of decorating them.


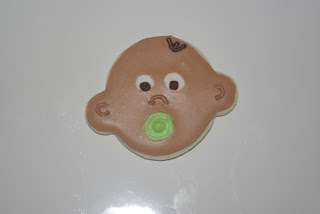
So, when that happens, my girls and I play a little creativity game, common among cookie-bakers... we try to come up with as many ideas for the same cookie cutter as we can. For example, this cookie cutter, which started out as Curious George, ended up as a baby and a London Underground sign.


(Sometimes I don't even fully decorate them, I just use the icing I have on hand, so the colors might not be right, etc., but it is fun to try new things and stretch our imaginations!)


When we don't want to use up the cookies, we just trace the cookie cutter onto paper and design that way.  Here are the ideas that Reader R., my 7 y.o., came up with for this cookie cutter...


I think her ideas are pretty creative!  I think this "Alien Spaceship" with the creature saying "Bye!" is my favorite! ;^)


For some other great examples of how this cookie game is played check out these great blog posts:


And then, when we don't have the perfect cookie cutter, despite having hundreds of them, we just make one up. In this case, the "Yellow Hat" is actually a cowboy hat brim hand-trimmed flat with the handle of a purse baked together to make the smooth top, but that is a different game! ;^)

Callye, at Sweet Sugarbelle is a master at the combining cookie cutters game.  Check out the cute ones she just made for the Olympics with a tie and a circle or my current favorite combining a top hat and a chocolate kiss.

So, now you know what cookiers do when it is too hot to turn on the oven!

Have a great day!
Sarah


Wednesday, July 25, 2012

Wedding Bells are Ringing...

I now pronounce you, "Mr. and Mrs. Cookie!"

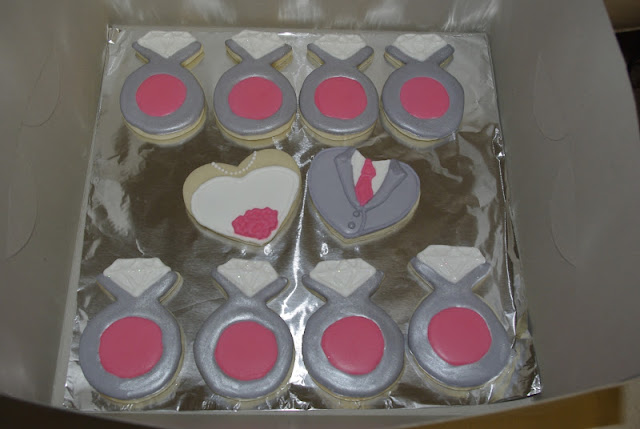
I recently had the privilege to make cookies for a Bridal Shower celebrating the upcoming marriage of Bethany and Jim.  My customer, one of the party hostesses, requested engagement rings, using the wedding colors Coral and Grey.  We also decided that it would be good idea to add some fun sparkle and shine!


I also had fun making these special extra Bride and Groom heart-shaped cookies for the guests of honor!

I based the groom cookie off of this picture that turned up when I googled "grey tuxedo."  It turns out that grey is a very popular tuxedo color for this wedding season!

I love the more intricate dress on my second Bride cookie, but wanted to get the coral in on the ones that I gave the customer, so I included it in the bouquet.

 I used disco dust on the diamond and  luster dust on the ring and  to make them sparkle and shine.  I learned this technique this great tutorial by Bridget at Bake at 350!  Thank you!


I boxed them up pretty for delivery, but ultimately,
they would be wrapped individually as party favors.


Best wishes to Bethany & Jim!
Thanks, Jodi, for your order!

Cheers!
Sarah


Happy Anniversary Sweet Shoppe!

This past week, I celebrated the 1st Anniversary of Sarah's Sweet Shoppe!


I am so thankful for the support and encouragement that I have received from my family and friends and the cookie community.  I am amazed how much I have learned and grown.  Thank you!  


I have come a LONG way, since these first official cookies.   Thank you, Kari!

I was so proud of these VERY bright cookies.  In a way, I still am because they show where I started and the heart of my business... doing something I enjoy, with people I love, for friends supporting a cause I care about.  (Visit Anna's Heart for Haiti to learn more an amazing young lady and her work to raise money for the Global Orphan Project in Haiti.)

Thank you to my best friend Dana, who knew I could do this before I even did... and ordered baby shower cookies from me four years ago! 
In the beginning,  all of my cookies were simple fluffy frosting cookies. 


My first Royal Icing cookie. 
The encouragement and challenges of my cookie customers has helped me to grow.  A request for lego cookies forced me to learn both how to get by without a cookie cutter and how to make my own (Thanks, Bridget at Bake at 350 and Callye at Sweet Sugarbelle!) Plus, no one wants a fluffy lego, so I also learned how to make and use Royal Icing (Thanks Callye!), both of which have expanded my horizons exponentially.  For the full Lego Man tutorial, visit Callye, her cookies were the inspiration for this project.


I love how Sarah's Sweet Shoppe continues to challenge me to learn and grow, so in celebration, I created these ombre birthday cookies.


They were inspired by all of the cool looking cakes and goodies out there and in particular by this cake made my friends Tammy and Clarissa!

The wonderfully creative ideas of fellow bakers, cookiers, and artists, and their ever-so-helpful tutorials have been such a blessing to me.  Thank you!

So, as a way to say "Thank You" to the cookie community and in celebration of the Sweet Shoppe's 1st Anniversary, I am going to post my first tutorial...


Ombre Icing Tutorial

To make an ombre cookie or even cake, you need several shades of the same color of icing.  To do this, I worked out this system of coloring and saving that is pretty straight-forward.

I started with Sweet Sugarbelle's Royal Icing. I scooped out PLENTY of super firm icing into a two cup measuring cup.

I knew that I wanted six  shades of Coral.  I purchased a Coral color food coloring and was disappointed to find that it was NOT true to the sticker on the top, so I pulled out my handy-dandy Color Mixing Chart courtesy of Sweet Sugarbelle to learn that Coral is three parts rose pink and two parts lemon yellow.


To achieve that, I used my lemon yellow and rose pink gel "tub" colors.  I often use squeeze colors (such as Americolor), but in this case, I wanted to add the color VERY gradually.  (A big PLOP of color would have been VERY BAD for this project.)


I would stick my toothpick into the color.  As you can see, I put the rose pink in about a third deeper than the lemon yellow to achieve the prescribed 3:2 ratio.  I would scrape the toothpicks on the side of my measuring cup (and toss the toothpicks).


After each addition of color, I scooped out some into a smaller bowl. (It didn't matter that there was a little bit of the just lighter shade still  in the bowl.  This cut down significantly on dishes too! ;^)


Then, I used my spray bottle to make it into the thick-flood "twenty-second" consistency that I needed for my cookies.  Getting this right is EXTREMELY important for a polka-dot ombre cookie.

One of my six icings (#3) was a tad too runny and gave me LOTS of headaches in trying to keep my dots a consistent size and not running into one another.  In hindsight, I would have been better off to A) test it before I bagged it, by putting just a tad in a tip (without a bag) and pushing it through with my thumb to make a few little polka-dots and see if they acted right (sorry, I can't remember who taught me this genius idea that I forgot at the time) or B) cutting my loses and unbagging and adding some powdered sugar to thicken it, instead of forging ahead. (If it had been for a customer, instead of just for ME... I would have taken the time to get it right, instead, it provided another teachable moment. ;^)


Once it was the right consistency, I rolled the first color into plastic wrap as described in this tutorial by Karen at Karen's Cookies!  (Thank you!)

I also numbered the rolls because getting them out of order would also be a BIG problem for this cookie. ;^)

Then, I repeated the process until I had all six strengths of the same color icing!  I bagged them with a #2 tip and went to town on my cookie, which already had been flooded (the day before, so that it would be super-dry) with white icing.

As for the polka dots, I learned that it is VERY hard to do graduated-size dots on a flat cookie.  I had wanted them to be bigger at the bottom and smaller on top, but when I did that a it was VERY tricky to keep them lined up and I ended up with a LOT more white space at the top than I wanted to have.  I found it was easiest to keep your dots approximately the same size.  I did three rows of dots of each color to create my three tiered cake and then added a Sarah's Sweet Shoppe logo cookie on the top! ;^)  The other cookie, was a polka-dot cookie gone bad.  I ended up smearing the dots and then using a wet-on-wet technique to add swirls of the next deeper color.

Another great learning from this project is... if you are trying something new, one should probably bake more than two cookies to get it "perfect."  I ended up scraping the icing off and starting over on the icing on these cookies several times.   I was even tempted to scrap the whole post, just because they were not as "perfect" as I wanted them to be... until I was packing my husband's lunch this morning and came across these...


Two out of three of his Oreos were inside-out.  If the "King of Perfect Cookies" could have this happen, I can certainly post "learning" cookies!  

There comes a point when you just have to say "These are close enough... for cookies!"  

Finally, in hindsight, which always has 20/20 vision, I probably should have googled "ombre cookies" BEFORE I got started, instead of waiting until I was writing the blog post... a couple of amazing cookie artists have already written on this topic...
  • Amber at Sweet Ambs has this amazing tutorial on a brush embroidery ombre cookie.  I love how she put down the crumb layer, and also how she drew lines to keep her rows straight.
  • Callye at Sweet Sugarbelle also has this fun ombre cookie tutorial, so that you can skip everything I just taught you and get the look for a LOT less effort! 
Oh well.  Today, I will have my cookie and eat it too!

Cheers!
Sarah