Showing posts with label Cake. Show all posts

Tuesday, September 11, 2012

Happy Birthday, Reader R!


This past week, we have celebrated the 8th birthday of a super-sweet little girl! I say, "this past week" because we, in fact, celebrated all week long!  

The "opening ceremonies" of birthday week were a special dinner with  my Mom and Dad.  My mom has an annual beach trip with her friends that usually overlaps with Reader R's birthday.  It just gives us an extra reason to celebrate!  So this year, R. wanted a chocolate chip cookie cake for her "Hammie" party.

Poor "cobbler's kid."  I was in such a rush, I just slapped on some store-bought frosting and even forgot that she hasn't gone by "Becca" since she turned 4.  Opps.
The fun birthday hat is a Schalekamp Family tradition!

Then, we had a BIG SURPRISE friends-party for her, but that is another story...


The next day, we had our big family party.  For that party, she wanted "A rectangle fun-fetti cake with flowers on it."  It honestly threw me off a little.  At my house growing up, rectangle cakes were what you took to a pot-luck at church.  Birthday cakes were CIRCLES or maybe HEARTS.  On cake stands.

Terrified of the "Wilton Rose,"  I made several suggestions of other cake designs.   I really wanted to make her this cake made my friends Tammy and Clarissa, which I had had my eye on for some time...  However, she was really adamant that she wanted "a rectangle cake with roses."  So, I did my best to fulfill her wish.

(Deep down, I think she was REALLY trying to make it "easy" for me.  Since 99% of bakery cakes are rectangles with roses, she probably thought that would be simple to do.  Either that or she REALLY just wanted me to break down and buy a cake from the COSTCO!)


Procrastinating until the last possible moment and not having quite the right supplies... after watching several You-Tube videos, I improvised (using a upside-down bathroom-sized dixie cup instead of a rose nail and a 103 tip instead of a 104 for those who care...), and was pretty pleased with the results.  The only thing couldn't figure out was how to actually transfer the roses to the cake without smooshing them.  I reached out to some of my cookie friends and they saved the day!

Finally, for her party at school she wanted "Gooey butter cake."  That one was a little hard for me to swallow too.  For someone that makes a living baking cookies... I was a little sad that she didn't want cookies for any of her MULTIPLE parties.  In the end it was a pride issue.  How can the "cookie lady" show up to school with Gooey Butter Cake for her OWN daughter's birthday.  However, once I got over that, I was pretty thrilled, because Gooey Butter Cake is like the easiest treat ever!  But that is another story...  I did, however, forget to take a photo, so that will have to wait too.

Happy Birthday Reader R!
Cheers!
Sarah

BTW, Reader R. LOVED the cake, and now, sister K wants "a rectangle cake with roses" for her birthday, too.


Wednesday, July 25, 2012

Wedding Bells are Ringing...

I now pronounce you, "Mr. and Mrs. Cookie!"

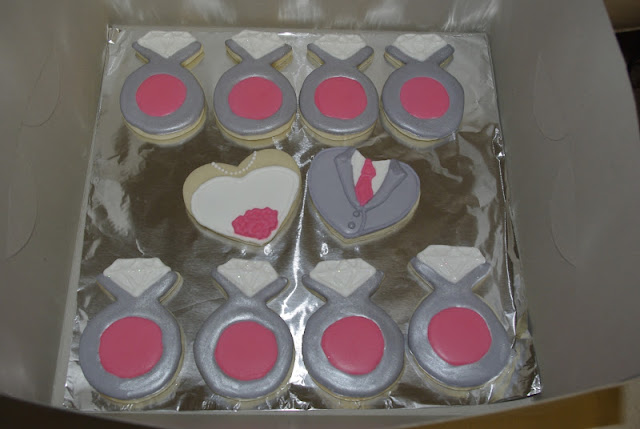
I recently had the privilege to make cookies for a Bridal Shower celebrating the upcoming marriage of Bethany and Jim.  My customer, one of the party hostesses, requested engagement rings, using the wedding colors Coral and Grey.  We also decided that it would be good idea to add some fun sparkle and shine!


I also had fun making these special extra Bride and Groom heart-shaped cookies for the guests of honor!

I based the groom cookie off of this picture that turned up when I googled "grey tuxedo."  It turns out that grey is a very popular tuxedo color for this wedding season!

I love the more intricate dress on my second Bride cookie, but wanted to get the coral in on the ones that I gave the customer, so I included it in the bouquet.

 I used disco dust on the diamond and  luster dust on the ring and  to make them sparkle and shine.  I learned this technique this great tutorial by Bridget at Bake at 350!  Thank you!


I boxed them up pretty for delivery, but ultimately,
they would be wrapped individually as party favors.


Best wishes to Bethany & Jim!
Thanks, Jodi, for your order!

Cheers!
Sarah


Thursday, June 28, 2012

London 2012 - GO USA!

We are having a wonderful summer at the Rose home.  Thank you for your patience and encouragement as I took some time off to be with my family, teach Bible at VBS, and celebrated my birthday week! ;^)

We are excited about working on badges for American Heritage Girls (Reader R., my sweet over-achiever, approval-junkie, picked out 19 badges that she wants to try to earn this summer), and we have been having fun participating in Focus on the Family's Olympic Fitness Challenge  trying to squeeze in a little bit of daily fitness despite the heat.  
Reader R. with the first cake she decorated herself,
for her Cake Decorating  badge, of course!
Of course, what we would rather be doing is baking cookies...
 or sitting around watching countless hours of other people exercising!
Less than one month until the OLYMPICS!  Go USA!

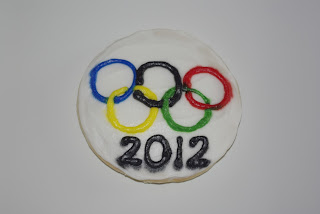
Olympic cookie created with extra frosting... ;^)
(Yes. I baked the cookie more than a month ago, and then sat on the photo to share it one month from the Olympics starting, and missed the date.  Man! Oh well!)

Cheers!
Sarah

Tuesday, June 26, 2012

Are you Curious about Allergies? Just Ask!

Good Morning Sweet Shoppe Friends!

Do you have a loved one with food allergies?  Is it hard to find the perfect treat for him/her?  Are you "Curious" about whether Sarah's Sweet Shoppe can help?  Just Ask!

As a home-based bakery, we to do NOT have the protections in place to be able to accommodate a SERIOUS allergy.  That said, I am happy to speak with the customer (I would prefer to also speak with the person with the allergy or their parent) to see if I can make treats that are safe for you or your child.

Dairy-Free Curious George Cookie and Personalized Man with the Yellow Hat Special Extra

For example, I recently, was asked to make a dairy-free cake and cookies for a sweet little boy's 2nd Birthday Party.  While it was a little challenging, to learn what would be safe for him to eat, I was able to create both, with only a small added expense for special supplies.  The cookies didn't taste exactly like my standard cookies, but they were still adorable and delicious.  Because the birthday boy was small enough not to be helping himself, with the Mom's "blessing," I was even able to put the dairy and non-dairy cookies in the same box.

Dairy-Free Cookies are Marked with the Birthday Boy's Name "Tate"

For these dairy-free cookies, I was able to use "Earth Balance" as a butter substitute.  (I found it at the Walmart Supercenter, for about $5.) It worked pretty well. The cookies were not quite as soft and fluffy as they usually are.  They were more the consistency of a thick pie crust and flakey.  They also had a bit of a "nutty" taste to them, however several taste-testers said that they were yummy! ;^)

However, a preschool asked me about baking nut-free cookies for their graduation program, because several kiddos had serious nut allergies.  I had to decline this opportunity, because I do have nuts and nut products in my kitchen.  I also usually use pure Almond extract in my cookies.  Without being able to speak directly to the person with the allergies, I would not be comfortable labeling my cookies as nut-free for a buffet line.


Dairy-Free Curious George Cake~
Dark Chocolate with Dark Chocolate and Caramel Frosting
& Royal Icing Transfer Eyes

That said, a mother ordered "nut-free" cookies for a preschool class party last fall.  No one in the class had an allergy, they just had to be nut-free to meet the requirements of the school's nut-free policy.  I made those cookies with  vanilla extract, and they were OK for that class.  So, it really is an order-by-order deal.

I have also been asked about glutten-free cookies.  I have not tried them yet... but would be happy to if I had a customer who needed them.  Again, it helps me to talk to the person with the allergy challenge, so that I can save time (and expense) in researching what products work and do not work for the particular customer.  I do also have to add a small fee to cover my additional expenses, since I do not buy allergy-free products in bulk.


Dairy-Free "Tate" Cookie (right) with "Regular" cookie (left)


I have heard that it is difficult to get gluten-free cookies to taste good, but truthfully, even cardboard cutouts would decorate-up super fun! And everything tastes better with icing!  ;^)

Please do not hesitate to ask!

Cheers!
Sarah

Monday, March 5, 2012

Happy Birthday Lil' L!

My "baby girl" turned two today!  I had a hard time believing how quickly the past two years have gone and what a "big girl" she is now.  "The days are slow, but the years are fast..."

We had a big family party with my husband's side of the family yesterday... three cousins have birthdays this week, so we had lots of cupcakes and sang "Happy Birthday" three times! And then today, we had just a small family dinner with my brother, sister-in-law, and their daughter, who is also two...  Lil' L. loves Minnie Mouse, so these were her special birthday treats...

Minnie
(Her nose is a little high on her face, and she is missing her eyelashes, but other than that...
she turned out ok for a thrown together leftover cake.)
Poor, neglected third kid.

After bailing on treats for the big family party, I was struck by a case of Mommy Guilt and feeling bad for my "poor, neglected third kid," I bought a Minnie Mouse balloon and a couple of cans of frosting at the grocery store this morning.  The best part was that the cake was pieced together from the frozen leftovers from the "cake-pop" experiment, so I didn't even have to bake a cake, and I have no more leftover cake-pop cakes hogging room in the freezer and making me feel bad for being a cake-pop-flop. Plus, I used my candy melts to make these SUPER yummy Oreo Micky and Minnie cookies.


If you're headed to Disney or just returning, these treats are fun for a pre- or post-party. I made these after we went to Disney (found inspiration online at several different sites). Just press some mini Oreos halves into the Double Stuffs, and then dip the bottoms into colored Winston's candy melts. Decorate with white icing that hardens to add dots, and then stick a candy stick in for a fun "lollipop" twist.
Original inspiration from Pintrest

I got the idea from this Pintrest pin... which was repinned from this blog (http://aars5.blogspot.com), but I could not find the original post for it.  Lil' L. isn't much into food on-a-stick, so I just skipped the stick and did it my way...plus, I didn't like the fact that you could tell that they were Oreos... and I couldn't get my ears to stay in place, so...

I wish that I had taken in-process photos for you so that I could do a proper tutorial... but I didn't.  So here is how I found was the best way to make these SUPER yummy (did I already mention that) and super easy, once you know how to do it, treats...

Shopping List:  
- Double-Stuffed Oreos
- Mini Oreos
- Wilton candy melts (red, pink) and Almond Bark (chocolate and white chocolate)  ((You can use candy melts for it all, but the Almond Bark is less expensive and works just fine, plus it is what I had, so...))
- Sticks (if you want them)

1) Use a paring knife to scrape out just a little bit of frosting from 2 o'clock and 10 o'clock positions on the D-S Oreo. (Scrape it off into a bowl for your helper to eat.)

2) Open and scrape the frosting off a Mini.  Keep the cookie, ditch the frosting.

3) Melt your chocolate, according to the directions on the package.  Use a microwave safe bowl that is deep enough to dip the top half of the cookie.

4) Dip about 1/4 of the Mini in the chocolate and stick it in place at 2 o'clock. Repeat for 10 o'clock.  Let harden on a sheet of wax paper or parchment.

5) Then dip the top half of the cookie in the chocolate, gently tap the excess chocolate off over the bowl, and lay on wax paper to dry/harden.  (I actually ended up spooning the chocolate over my cookie instead of dipping, because in my initial trials, before I "glued" in the ears with chocolate, I kept losing my ears.  Also, I was running low on chocolate and didn't want to fully coat the back side.) If it leaves a puddle, use a toothpick to create a separation line BEFORE it hardens.

6) Once the chocolate is VERY hard, melt your red or pink candy melts.  If you want to put it on a stick, you will want to dip the tip of the stick in the candy melt and stick it quickly into place, and then quickly spoon the candy coating on to the bottom of your cookie, gently tap off the excess candy over the bowl, and let dry in a cake-pop holder.  If you are skipping the stick, then dip or spoon chocolate over the bottom side of your cookies, gently tap the excess candy off over the bowl, and lay on wax paper to harden.  (I preferred to spoon it, because I didn't want the chocolate to melt from the top and discolor my candy for the bottoms.)  Also, I wanted hot pink bottoms, but I only had light pink candy melts, so I used the red and then stirred my leftover red into my light pink.  It worked fine.

7) Then, melt the white chocolate and put into a decorator's bottle.  For Mickey's buttons, I tried to use some white chocolate chips that I had, but they didn't melt into place like I thought they would, so they stick out too much.  For Minnie's skirt, I used melted white chocolate chips (and they didn't melt smooth, so I thinned them with shortening, but then they were too runny to make good consistent polka dots.) Learn from my mistakes and use either candy melts or white chocolate almond bark.

8) Let dry and serve with love.

And here are a couple of photos of my "big girl" on her "big day!"


 (Aren't you glad I spared you the potty training pictures from the weekend?)

Cheers!
Sarah


Saturday, February 18, 2012

Curious K Turns Four - Curious George Style!


My darling daughter, Curious K, turned FOUR earlier this YEAR.  For this big birthday, she wanted all things Curious George... Surprise!


Cute cookies for her preschool class.

With her birthday so near to the holidays, we often end up having multiple celebrations, so here is a peak into the myriad of treats I cooked up for my curious girl!

Cupcakes for her family dinner.

The big "Happy Birthday Hat"
is a special family tradition.

My big girl and her cake!


Happy Birthday,
Curious K!

I love you!
Momma

Sunday, December 25, 2011

One the First Day of Cookie Christmas...

Sweet Sarah gave to me, a birthday cake for Jesus! (read Je-e-e-us...)

 
"And she gave birth to her firstborn son
and wrapped him in swaddling cloths
and laid him in a manger,
because there was no place for them in the inn."
Merry Christmas!
Sarah

Monday, November 28, 2011

Happy 5th Birthday Emma!


This weekend I baked these adorable balloon cookies for one of my favorite 5 year olds, sweet Emma!


(Of course, my sweet girls got their own set of monogrammed balloon cookies, too!)


I hope your birthday and the year-to-come
are as sweet and special as you are!

Thank you, Ranee, for your order!


Cheers!
Sarah