Showing posts with label Birthday. Show all posts

Thursday, September 13, 2012

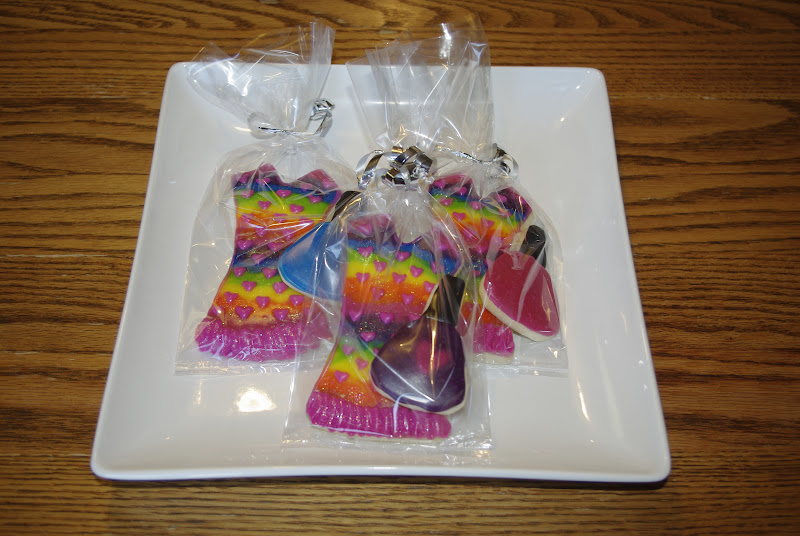
Pajamas Cookie-d

For Reader R's big SURPRISE party, we had a Pajama & Pancakes theme.  I really wanted to bake some special cookie treats for party favors!


Since it was a SURPRISE party, I had to be extra stealthy about it, so I made a bunch of nail polish cookies too.  (I told her I had a last minute order for a very important customer who would pick them up for her party on Saturday... hehehe.)


Inspired by these super cute striped cookies by Oh, Sugar! Events, I endeavored to cookie my daughter's favorite pajamas.  


First of all, I had to be sneaky and get a photo of the birthday girl in her pjs... so one night, I told her I wanted to send Grandma photo of how big she was getting and got her to pose for this snap. ;^) 


Then, I didn't have the right cookie cutter for her little sleeveless gown, so I used a blouse, and then cut off the sleeves with an awareness ribbon.  I could have just used a knife, but I really wanted to keep the curve of the dress consistent, and this was the best way I could come up with to do that.


Next, I wasn't quite sure how to pull of the air-brushed look of the pjs without an airbrush, so after a quick consultation with my cookie friends, I decided I would bake enough cookies to make them two ways. 


First, I created a rainbow of glaze colors.  I tried to flood the pjs, very quickly and get them to bleed into one another, but wouldn't you know the one time you WANT your colors to bleed, they wont!  So, I ended up laying down the colors one at a time and using a tooth pick to swirl them together to create a "bleed" effect.  I sprinkled them with Rainbow Disco Dust to give them some sparkle and then once they were really dry I added the trim, the hearts and the ruffle.  The ruffle was its own challenge.  Because I decided to use glaze for these cookies due to their deep colors, the glaze was not stiff enough on its own to hold a ruffle, so I had to add just a pinch the meringue powder that I use for royal icing.  That did the trick! ;^)


I could have stopped there, but I had it in my head that I really wanted the colors to "bleed" so I decided to go ahead and make a second batch using a different method.


For the second batch of cookies, I coated them with a base coat of white glaze.  Then, I used silver luster dust, mixed with a drop of gel color, and a couple drops of vodka to create a rainbow of colors.  Then, when the white was SUPER dry, I painted the rainbow of lustery colors on in good ol' ROYGBIV order.  (Thank you to my cookie friend, Jennifer, who reminded me that is REALLY the best way to go!)


I was so pleased with how the gel color mixed in with the luster.  Now, I don't have to buy a different jar of luster for every color!  Hooray!  Next I added the hearts, the trim, and the ruffle.  Finally, as a special touch, I added a little bit of hot pink disco dust to the ruffle.

It is interesting how bright they looked when they were wet and how they kind of got pastel-y when they dried.  That was OK with me... but if you were going for bright you might want to use even more color.


I was really very pleased with both cookies.  In the end, I ended up using the first, brighter one for the party favors.  (I decided I might have a few guests who mothers would not be thrilled that on top of fruit loops, pink and purple pancakes, chocolate chips and whipped cream, cupcakes and cookies, I sent their 8 year old daughters home with a large cookie coated with vodka... ;^)  ((Just kidding, we cookiers use vodka because the alcohol evaporates so quickly that we can paint on our fragile sugar icing without the cookies getting too wet and melting.  You might have even eaten a vodka covered cookie and didn't know it! ;^))


All that is to say, I was thrilled with how they turned out, and I think the birthday girl was pleased too! ;^)

Cheers!
Sarah


Wednesday, September 12, 2012

SURPRISE! Happy Birthday Reader R! (part II)

So, as you now know, this past week was Reader R's birthday....

Her BIG party, however, was almost didn't happen...  in her mind, anyway!


I had set the scene several weeks ago by telling her that "Since Daddy was celebrating a BIG birthday this year, we just won't be able to have friends party for you, too."  She accepted the information graciously, but then she, unfortunately, spent several weeks being too self-less and over concerned about our finances.  (Opps!)

Anyway, the big day came, and all of her sweet little friends gathered at our house and anxiously awaited her arrival.  


I had decorated with LOTS of balloons, streamers, plastic table cloths, and pieces of fabric leftover from a baby shower several years ago.  Since I was trying to keep within a budget, I was thrilled to figure out that I could make these super fun tissue poofs, using the stash of leftover pink and purple tissue I have meticulously smoothed out and saved for the last 8 years!  I started with this great tutorial that I found on Pinterest.  (My only additions would be that you can use 1/2 a sheet for smaller balls, and for bigger balls, I liked 15-16 sheets better than 10, which looked a little sparse to me.)


The girls made fruit loop necklaces and played a couple of ice-breaker games while they waited for sweet R.  


When she got here, Reader R. was super surprised, and the girls rushed her with a big group hug!


Next, we had a super-girly breakfast with pink and purple pancakes, cherry yogurt, and sausage.  At the suggestion of this great blog post from Cassie at Hi Sugarplum,  I put fun toppings (strawberries, blueberries, bananas, granola, chocolate chips, and whipped cream) on the table for the pancakes and yogurt. (Actually, I got a LOT of "my" ideas from Cassie!!! Thank you!)  The girls also had fun cutting their pancakes into fun shapes with cookie cutters!


After breakfast, I painted the girls toenails.  (I had asked permission from the parents ahead of time, which was a good thing, because one little girl said "My mom doesn't let me paint my toenails without adult supervision."  I guess, I didn't count as an adult. ;^))  I kept the colors simple, pink, purple or blue, and then a second coat of "princess sparkles."  It was so fun.  the girls sat in a semi-circle around half of a dollar store plastic table cloth.  It was a great way to keep the nail polish put.  When we were done, I just wadded up the table cloth and tossed it!


Even her little sisters got in on all of the fun!

I kept the girls hands busy with a fun craft while I was painting their toes!  We made these cute flip-flops! I used this tutorial to do all the prep work ahead of time.  I also made a pair for myself and the two little sisters ahead of time, since I knew we would need a prototype and they wouldn't be able to get theirs done without my help and I would be painting toenails!


We opened gifts and then sang Happy Birthday!

Then, we enjoyed the cute cupcakes at the top of the post.  My good cookie friend, Kim from the Cookie Puzzle, lent me her fingernail polish cookie cutter and her recipe for glaze icing, which made these  nail polish bottles shinny and extra fun!  Thanks Kim!!


(Please ignore the construction zone in the background...
my wonderful husband is painting my dining room!)


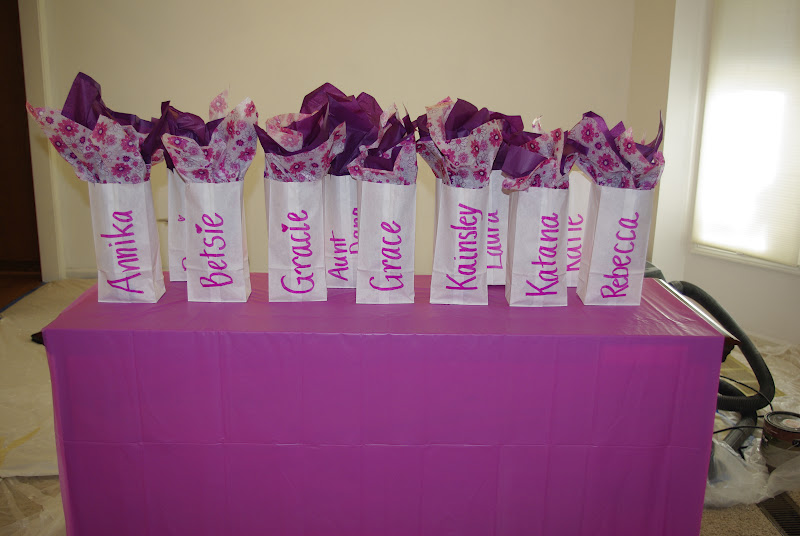
The party favor bags included a bottle of water (wrapped in hot pink duct tape, like this idea, and then labeled with a fancy initial sticker; sorry, I forgot to take a picture), a package of pink bubble gum, and a set of party favor cookies with a pair of pjs (just like my daughter's favorites) and a bottle of nail polish.  (I'll post more about the PJ cookies soon.)

I also threw in a kit to make a cute bracelet that I had picked up in a 10 pack at Hobby Lobby, that was my back up craft, but that we ran out of time to do at the party!


A special thanks to Poppie for taking Reader R on a special date night and sleep over, so we could decorate  and really surprise her!  Thanks to Aunt Dana for being my right-hand girl, helping out in every way on party day!  Thanks to my Sweetheart for working so hard to help get the house ready and for capturing the big event for me!  Thank you to Kim and my SweetBook Sisters for all of your encouragement!  Thank you to Hi Sugarplum, Oh Sugar Events, Design Dazzle, and a thousand other hard-working moms on Pinterest for inspiration!

All pandemonium broke loose at pick up time when we momentarily lost control of the party! ;^)

Cheers!!
Sarah

P.S. - Come back tomorrow for all the details on the PJ cookies!

Tuesday, September 11, 2012

Happy Birthday, Reader R!


This past week, we have celebrated the 8th birthday of a super-sweet little girl! I say, "this past week" because we, in fact, celebrated all week long!  

The "opening ceremonies" of birthday week were a special dinner with  my Mom and Dad.  My mom has an annual beach trip with her friends that usually overlaps with Reader R's birthday.  It just gives us an extra reason to celebrate!  So this year, R. wanted a chocolate chip cookie cake for her "Hammie" party.

Poor "cobbler's kid."  I was in such a rush, I just slapped on some store-bought frosting and even forgot that she hasn't gone by "Becca" since she turned 4.  Opps.
The fun birthday hat is a Schalekamp Family tradition!

Then, we had a BIG SURPRISE friends-party for her, but that is another story...


The next day, we had our big family party.  For that party, she wanted "A rectangle fun-fetti cake with flowers on it."  It honestly threw me off a little.  At my house growing up, rectangle cakes were what you took to a pot-luck at church.  Birthday cakes were CIRCLES or maybe HEARTS.  On cake stands.

Terrified of the "Wilton Rose,"  I made several suggestions of other cake designs.   I really wanted to make her this cake made my friends Tammy and Clarissa, which I had had my eye on for some time...  However, she was really adamant that she wanted "a rectangle cake with roses."  So, I did my best to fulfill her wish.

(Deep down, I think she was REALLY trying to make it "easy" for me.  Since 99% of bakery cakes are rectangles with roses, she probably thought that would be simple to do.  Either that or she REALLY just wanted me to break down and buy a cake from the COSTCO!)


Procrastinating until the last possible moment and not having quite the right supplies... after watching several You-Tube videos, I improvised (using a upside-down bathroom-sized dixie cup instead of a rose nail and a 103 tip instead of a 104 for those who care...), and was pretty pleased with the results.  The only thing couldn't figure out was how to actually transfer the roses to the cake without smooshing them.  I reached out to some of my cookie friends and they saved the day!

Finally, for her party at school she wanted "Gooey butter cake."  That one was a little hard for me to swallow too.  For someone that makes a living baking cookies... I was a little sad that she didn't want cookies for any of her MULTIPLE parties.  In the end it was a pride issue.  How can the "cookie lady" show up to school with Gooey Butter Cake for her OWN daughter's birthday.  However, once I got over that, I was pretty thrilled, because Gooey Butter Cake is like the easiest treat ever!  But that is another story...  I did, however, forget to take a photo, so that will have to wait too.

Happy Birthday Reader R!
Cheers!
Sarah

BTW, Reader R. LOVED the cake, and now, sister K wants "a rectangle cake with roses" for her birthday, too.


Thursday, June 28, 2012

Choo, Choo, Braxton is Two!


Recently, a cute little boy celebrated his 2nd Birthday at Fritz's Railroad Restaurant, a local Kansas City restaurant that delivers your meal by train!  


His sweet Momma really wanted Royal Icing for the cute details, but knew that the two-year old crowd would prefer the Fluffy Frosting.  I was so pleased to be able to provide super-cute, detailed cookies with fluffy frosting!  ;^)


For Braxton's "Special Extra" cookie, I was trying to coordinate with the theme and these adorable invitations created for the event by Mikaela Garret at rivalgraphicdesign.com.  (You can reach her at 913-626-1100 or mikaela@rivaldesign.com, if you need any cool designs for your next special event.)


Thanks Laura for letting me share this special day with you!  Thanks Mikaela for the adorable inspiration!

Cheers!
Sarah


Tuesday, June 26, 2012

Are you Curious about Allergies? Just Ask!

Good Morning Sweet Shoppe Friends!

Do you have a loved one with food allergies?  Is it hard to find the perfect treat for him/her?  Are you "Curious" about whether Sarah's Sweet Shoppe can help?  Just Ask!

As a home-based bakery, we to do NOT have the protections in place to be able to accommodate a SERIOUS allergy.  That said, I am happy to speak with the customer (I would prefer to also speak with the person with the allergy or their parent) to see if I can make treats that are safe for you or your child.

Dairy-Free Curious George Cookie and Personalized Man with the Yellow Hat Special Extra

For example, I recently, was asked to make a dairy-free cake and cookies for a sweet little boy's 2nd Birthday Party.  While it was a little challenging, to learn what would be safe for him to eat, I was able to create both, with only a small added expense for special supplies.  The cookies didn't taste exactly like my standard cookies, but they were still adorable and delicious.  Because the birthday boy was small enough not to be helping himself, with the Mom's "blessing," I was even able to put the dairy and non-dairy cookies in the same box.

Dairy-Free Cookies are Marked with the Birthday Boy's Name "Tate"

For these dairy-free cookies, I was able to use "Earth Balance" as a butter substitute.  (I found it at the Walmart Supercenter, for about $5.) It worked pretty well. The cookies were not quite as soft and fluffy as they usually are.  They were more the consistency of a thick pie crust and flakey.  They also had a bit of a "nutty" taste to them, however several taste-testers said that they were yummy! ;^)

However, a preschool asked me about baking nut-free cookies for their graduation program, because several kiddos had serious nut allergies.  I had to decline this opportunity, because I do have nuts and nut products in my kitchen.  I also usually use pure Almond extract in my cookies.  Without being able to speak directly to the person with the allergies, I would not be comfortable labeling my cookies as nut-free for a buffet line.


Dairy-Free Curious George Cake~
Dark Chocolate with Dark Chocolate and Caramel Frosting
& Royal Icing Transfer Eyes

That said, a mother ordered "nut-free" cookies for a preschool class party last fall.  No one in the class had an allergy, they just had to be nut-free to meet the requirements of the school's nut-free policy.  I made those cookies with  vanilla extract, and they were OK for that class.  So, it really is an order-by-order deal.

I have also been asked about glutten-free cookies.  I have not tried them yet... but would be happy to if I had a customer who needed them.  Again, it helps me to talk to the person with the allergy challenge, so that I can save time (and expense) in researching what products work and do not work for the particular customer.  I do also have to add a small fee to cover my additional expenses, since I do not buy allergy-free products in bulk.


Dairy-Free "Tate" Cookie (right) with "Regular" cookie (left)


I have heard that it is difficult to get gluten-free cookies to taste good, but truthfully, even cardboard cutouts would decorate-up super fun! And everything tastes better with icing!  ;^)

Please do not hesitate to ask!

Cheers!
Sarah

Tuesday, June 19, 2012

Happy Birthday To ME!

Thank you friends for your encouragement and patience with me over the last year as I have enjoyed this cookie company endeavor!  I am looking forward to what the next year may bring.  I am enjoying my short break from baking, but am looking forward to jumping in again for the Forth of July.  One of my projects this past month has been to update my photo book and catch up on my blogging.  Over the next couple of months, you will see quite a few catch up posts (including today's).  Hooray!  So if you have been worried that I created a cookie that you missed... worry no more!


SO... since today is my birthday, I am going to post some birthday cookies.  I love cupcake cookies... they are so cute!  I baked these for some dear friends whose daughter was turning one.  They were going to be traveling to celebrate with family, and cookies do hold up for travel way better than cakes or cupcakes!  I made them to coordinate with the paper goods.


HAPPY (belated) BIRTHDAY, ZOE!

Cheers!
~ Sarah


Friday, March 16, 2012

Cookie-d Memories: My Magnum Opus


Have you ever thought... "This is it!  I'd better stop now,
because it could not get any better than this?"
  

This is how I feel about these very special cookies.  I am not sure that I will ever love any cookies more than these "Happy Birthday" cookies I made for my very dearest friend, Dana, who is celebrating a big birthday this year.  As my gift to her, I created these cookies, which show not only where she has been, but my wish for her future and the foundation for the wonderful woman she is.


Dana and I meet in college at William Jewell College, in Liberty, MO.  We were kindred-spirits from day one and have been best friends ever since!  She is younger than I am, so we didn't always have our adventures that the same time... but we have so many memories in common it was almost like cookie-ing my own life story!

My favorite college English professor, Mike Williams, once said "Is a tree ever just a tree? No, it is a tree laden with deep symbolic meaning."  Well, is a cookie ever just a cookie?  Maybe.  But not it this case... each cookie is a cookie laden with deep symbolic meaning. (This is your warning... if you don't want all the sappy details of the cookies of my life, and can live with the guilt... bail now!)


My birthday wish for Dana, although it wouldn't all fit on the luggage tag, was that:

"Where ever life takes you,
May you always have your faith,
your family & your friends,
your compass & your big backpack."

(Please graciously ignore that it says "Whereever" with no space.  I have never been a good speller. A former teacher used to say that "My mind just worked too fast to bother with getting the letters in the right places." [Which by the way is why I had such a hard time with college prep vocab, not because I didn't know the definitions, but because I couldn't spell the words.]  However, now that I am trying to help my Reader R. learn to spell, I am convinced that I am just silly and lazy in that area of life.  I mean really, how long would it have taken for me to google which "Where ever" or "Wherever" to use... [twenty-two seconds, because I just did it to figure out which was right before I wrote this], but instead, I just did it and hoped no one would notice that it wasn't right, if it wasn't, which I wasn't convinced of, until I googled it a second ago.  Of course, I also knew, deep down that I couldn't just let it slip by now that I knew that it was incorrect, but rather, had to point it out to the rest of the world and admit what I goof I am... instead, I will just say "My mind was working too fast to bother with getting the letters in the right places" and leave it at that.)


This cookie is for Dana's faith.  Her strong faith gives her true joy and gratitude, even in the difficult times.  She is an amazing sister and such an inspiration and encouragement to me.  (OK, are you still with me?  Was that deep symbolic meaning too much for you?)


These cookies represent Dana's family!  Her mother LOVE Mickey Mouse, so that cookie is for her parents and her family of origin.  She is married to a wonderful man named David, so the heart is their monogram. And she has two precious children, a girl and a boy.


This is my cookie.  (Yes. I cookie-d myself into her present.... tacky? A little, maybe, but we are dearest friends.)  So, yes, if I were a cookie, I would look like this.  (Just stick around, I may turn into one yet.  They say "You are what you eat.")  No, seriously, I love tea pots and my last name is Rose.  It doesn't get any more simple than that.  (OK, except for the cross.  That one was a give-away.)  What I love about this cookie, is that I tried the brush embroidery that Alison at Ali Bee's Bakeshop taught me!  Thanks, Alison!


The mortarboard is for our Alma Mater and the value of the education and life lessons that we learned there.  The compass is actually the Outward Bound logo.  We both spent 14 days in the Florida Everglades, canoeing and serving on an Outward Bound High Adventure trip during college, but also it serves as a reminder of Stephen Covey's concept of "True North" and always knowing what is really important to you.  The "Big Backpack" is symbolic of hopes and dreams.  We were recently discussing that although we are officially grown-ups and are working hard to de-clutter our homes, one of the seemingly odd items that we cannot seem to part with is our "Big Backpack" that we used to hike all over Europe.  (The squiggles in the background are supposed to be a journal entry.)  These two cookies are also fun because they are the first time that I tried painting on a cookie.  Thank you to Liz, a.k.a. Arty McGoo and Alison from Ali Bee's Bakeshop for the inspiration and the great tutorials.

"Oh the places you will go!"  During college, Dana and I both studied oversees in Oxford England, not at the same time.  We also both had the same internship in New York City, not at the same time.  I also had a Dora the Explore potty training sticker of Eiffel Tour on my shirt as I was decorating, so I toddled off into Na-Na land and created an Eiffel Tour sticker, hoping that she, too, like Dora and myself, had been to Paris. (Deep huh?) Turns out, she has a really great story about meeting a mutual friend and sorority sister under the Eiffel Tour, that I am sure I have heard at some point in the last 15 years and just happened to subconsciously bring up in time to make the perfect cookies for her birthday.  Thank you to Anne at the Flour Box, who convinced me that yes, I could make a telephone booth cookie, and Kim at the TomKat Studio for the tutorial on how to make an Eiffel Tower.  Although, both would have been easier with a KopyKake projector than drawing them by hand, looking at Dora the Explorer stickers for reference.


So, I individually-wrapped each cookie and bundled up our memories in a gift basket.  I added the outer-wrap so that they wouldn't spill out, and I VERY carefully delivered these delicious wishes to my very best friend.   (By the way, it is very hard to get a good photo of a gift basket... sorry.)

We laughed.  We cried.  We smiled so much our faces hurt, like rush in college.  We shared memories.  It was wonderful!  Thank you Dana for having a birthday, so that I could make these cookies!  (Which turned out to be a "for-you-for-me" gift... sorry!)

"We will always be dear old friends, 
until we are old and senile, 
then we will be dear new friends again."
I also want to say a brief thank you, my husband and my girls for supporting my cookie dream, to my parents for providing so many of these life-forming experiences, to my family and friends for buying my cookies, to all of my cookie mentors (whom I have never actually met, but feel like we are close friends), but especially Jodi at Wonderland Cookie Co.who taught me not to be afraid to link to cookies that are prettier than mine, and to my almost 100 followers who read my ramblings on a regular basis.  Thank you! 

Cheers!
Sarah